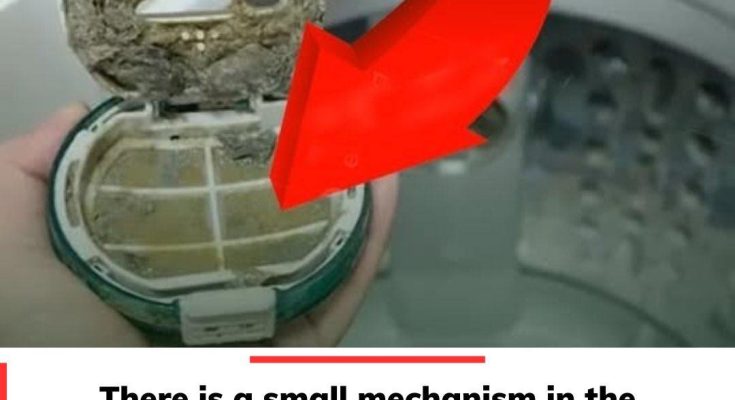
You probably already know that your dryer has to have its vent and lint trap cleaned on a regular basis. However, you might be unaware that a washing machine filter is in place to collect and hold onto lint and other waste.
To keep your washer operating safely and efficiently, this filter needs to be cleaned.
In addition to leaving clothing filthy and odorous, failing to clean a washing machine filter might eventually harm the machine itself.
Finding the washing machine filter (which may be the most difficult aspect of cleaning it), soaking and cleaning it, replacing it, and running a quick, empty wash cycle are the steps involved.
Everything you need to know to properly clean the filter, including how frequently to do it, is covered in this article.

Locating the Washing Machine Filter
Refer to the owner’s manual to find the filter on your washing machine. The filter is usually found in one of the following locations:
- In the center agitator
- In the drum’s top lip
- Behind a trap door on the front exterior of the machine
- Near the water pump or at the end of the drainage hose
The owner’s manual is probably available online if you no longer have a printed copy. Just search for the make and model of your washer and the term “user manual.”
Searching YouTube for instructional videos could be helpful for those who learn best visually. Instructional films are available on the websites and social media accounts of numerous washing machine manufacturers.
It’s also important to keep in mind that a lot of the more recent versions, such as high-efficiency (HE) models, rely on the pump mechanism’s self-cleaning capabilities rather than a filter. In general, owners don’t need to maintain these kinds of filters.
How Often to Clean a Washing Machine Filter
The frequency of washing machine filter cleaning varies depending on the manufacturer.
Though basic recommendations range from cleaning a washing machine filter once a month to cleaning the filter twice a year, it’s better to refer to the user manual for your specific machine.
The frequency of washing machine filter cleaning is also influenced by usage.
Cleaning the filter more frequently is recommended for large households that use their washers more frequently than smaller ones or for those who routinely launder extremely soiled things like cloth diapers or outdoor work clothes.
Signs that it’s time to clean the filter include:
- Lint buildup or dirt deposits, including excess detergent, on clothes after washing
- Improper drainage that leaves clothes soaking wet at the end of the wash cycle
- A mildewy smell that indicates there is standing water in the washer’s mechanisms
- It’s time to change the disposable lint trap filters found in some washers when they clog.
What You’ll Need
| Equipment / Tools | Materials |
| Cleaning cloth | Dish soap or liquid laundry detergent |
| Soft-bristle brush | Paper towels |
| Flashlight (optional) | |
| Shallow basin or old towel (optional) |
Instructions
How to Clean a Removable Washing Machine Filter
The majority of washing machine filters are detachable for cleaning. This is how you do it.
Step 1:
Wipe Off the Filter
Using a moist cleaning cloth, carefully remove the filter from its housing and remove any lint or dirt.
Step 2:
Clean the Filter Housing
To clean the filter housing of lint and dirt, use a cloth. You may wish to check for buildup in the filter housing with a flashlight. Additionally, you may want to arrange an old towel or a shallow basin on the ground to catch any water that spills out when you open the filter housing, depending on where the filter is placed.
Step 3:
Soak the Filter
Pour some hot water and a tiny bit (about 1 tsp.) of dish soap or liquid laundry detergent into a bucket, bowl, or basin big enough to soak the filter. Give the filter ten minutes to soak in the solution.
Step 4:
Scrub the Filter
To get rid of buildup, scrape the filter with a soft-bristle brush, like an old toothbrush or a dish brush.
Step 5:
Replace the Filter
Make sure it is firmly in place before returning it to the washer’s filter housing. Since washing machine filters will become wet again, they don’t need to be dry after being replaced, unlike dryer filters.
Step 6:
Run a Short Wash Cycle
To make sure the filter is firmly in place, run the washer through a brief cycle. If you see any leaks, take out the filter and put it back into its housing.


